


If you work in software development teams, you’re probably familiar with the concepts of Continuous Integration (CI) and Continuous Delivery or Continuous Deployment (CD). These practices are commonly combined in a CI/CD pipeline, which is an important part of DevOps. Basically, CI/CD allows you to automatically build, test, and deploy code changes – helping your team work more efficiently.
The CI/CD pipeline consists of three different stages:
- Continuous Integration (CI)
- Continuous Delivery (CD)
- Continuous Development (CD)
In this article, we’ll explain what are the advantages of CI/CD, what each of these three stages mean, and show you how to set up a CI/CD pipeline for your projects using n8n workflows with GitHub, GitLab, TravisCI, and CircleCI.
Advantages of using a CI/CD pipeline
Using the CI/CD strategy in the software development life cycle has many advantages:
- Standardization of the code production and deployment process, helping to reduce errors and maintain code quality standards.
- Reduction in time and effort spent on testing and deploying the application manually. The DevOps team can focus on delivering features for the end-users.
- Ability to run tests on different platforms simultaneously and fix errors quickly
- Faster shipment of new features faster.
What is Continuous Integration (CI)?
Software development is commonly a collective effort, where multiple developers work in parallel on different features and merge their code changes to the main (or development) branch frequently.
CI validates the changes to the code by automatically building the software and running tests. You can set up different tests to ensure that the code changes pass all the tests, guidelines, and code compliance standards you established. If the tests are successful, the changes get merged, otherwise an error message is returned, making it easier to fix the bugs quickly. This process helps developers integrate their changes more efficiently.
To understand CI better, consider the n8n repository. Various developers contribute to the project by adding a new node, fixing a bug, or adding new functionality. When they push their code, instead of verifying each change manually, we set up automated tests that would build and test them. This strategy decreases the chances of introducing bugs and helps our team work more effectively.
Building a CI pipeline with GitHub Trigger and Travis CI
Two of the most popular CI tools out there are TravisCI and CircleCI, which offer functionalities for testing projects hosted on GitHub. n8n has nodes for all of these platforms, which makes it fairly straightforward to build a CI workflow.
We built one that triggers a build in Travis CI when code changes are pushed to a GitHub repo or a pull request gets opened. To get started, you can copy this workflow from the workflows page and configure the GitHub Trigger, IF, and TravisCI nodes as explained below.
(Note that you can replace the GitHub Trigger node with GitLab Trigger and Travis CI with CircleCI, depending on your use case.)
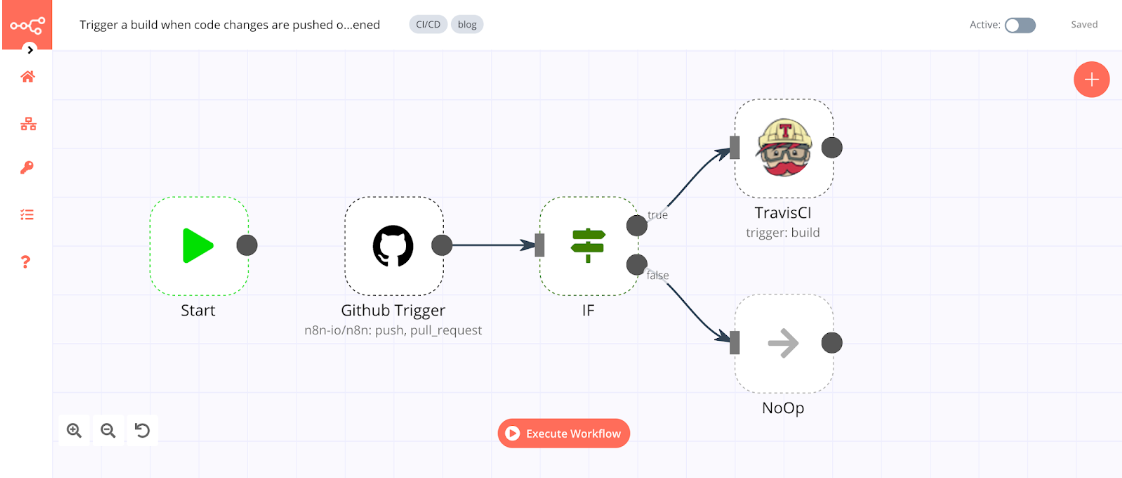
Set up GitHub triggers
First, you need to configure the GitHub Trigger node, which will trigger your workflow when new code changes get pushed to the project repository and when a new pull request is opened, updated, closed, or merged. In the GitHub Trigger node, configure these parameters:
- Github OAuth2 API: Enter your credentials (read our docs to learn how to get your credentials).
- Authentication: OAuth
- Repository Owner: the name of the owner of the repository you want to use (e.g. n8n-io)
- Repository Name: the name of the repository you want to use (e.g. n8n)
- Events: push, pull_request
Note that you can use the GitLab Trigger node if you host your projects on GitLab, the configuration is similar to the GitHub node.
2. Filter pushed changes / pull requests
The tests should only run if new changes get pushed or a pull request gets opened. To filter out the event, add the IF node and configure three parameters:
- Add a first condition that checks if changes were pushed:
Value 1: {{$json["headers"]["x-github-event"]}}
Operation: Equal
Value 2: push - Add a second condition that checks if the action for a pull request is opened:
Value 1: {{$json["body"]["action"]}}
Operation: Equal
Value 2: opened - Combine: ANY
This option runs the test when either of the above conditions is true.
3. Connect to the CI platform
The final step is connecting your CI platform of choice to integrate the changes. Add the TravisCI node and configure the parameters:
- Travis API: Enter your credentials (read our documentation to learn how to get your credentials).
- Resource: Build
- Operation: Trigger
- Slug: {{$json["body"]["repository"]["full_name"]}}
You can select this expression by clicking on: Current Node > Input Data > JSON > body > repository > full_name. - Branch: the name of the branch you want to use
You can also use the CircleCI node, which has a similar configuration to the TravisCI node.
That was it! Now you have a workflow that will build your project and run the tests you have written when code changes are pushed or when a pull request is opened.
What is Continuous Delivery (CD)?
With CI, your application is built and tested each time a code change gets pushed to the project repository. With CD, you automate the release process of the code changes. However, human intervention is needed to trigger the deployment.
In CD, all the stages involve automated tests and code release automation. At the end of this process, the operations team deploys the application to production. The goal of CD is to have a code base that is always ready for deployment.
To understand this better, let’s continue with the example of the n8n repository. After all the automated tests pass, the code is merged and is ready to be deployed.
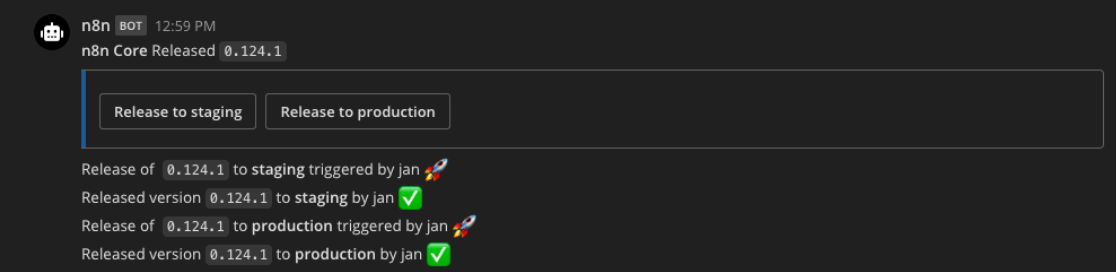
However, the deployment is not automated. The new version release is processed manually. The deployment of the latest n8n version on n8n cloud is also not completely automated, as an engineer from our team with the required access needs to press the Release to staging or Release to production button in Mattermost. (You can read here how we created this Mattermost slash command, and other useful ones.) This interaction triggers an n8n workflow that deploys the latest n8n version on the staging or production environment, respectively.
Building a CD pipeline with Telegram and GitHub
n8n can be used to deploy the application to the production environment. Once your CI pipeline returns a successful result, you can trigger your n8n workflow to release the changes.
The workflow can be triggered via a chat platform (e.g. Mattermost, Slack, Telegram, etc.) and you can even schedule the trigger using the Cron node or the Interval node.
Create a new release on GitHub
To help you get started, we created a workflow that allows you to release a new version via a Telegram bot command.
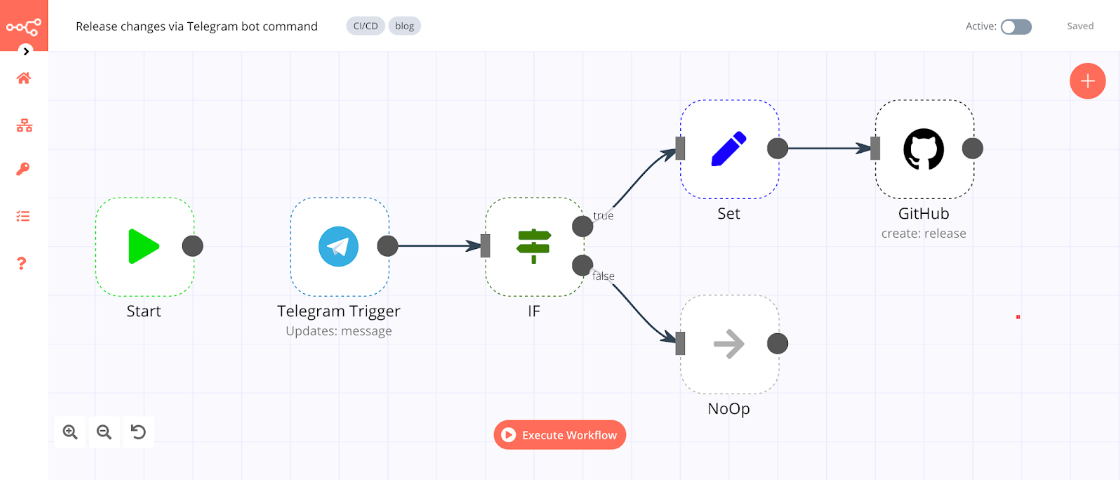
Here’s how to set up this workflow:
1. Set up Telegram triggers
Add a Telegram Trigger node to trigger the workflow when a message is sent to the bot.
- Telegram API: Enter your credentials (follow the steps mentioned in the Telegram credential documentation to get your Telegram credentials).
You also need to create a deploy command for your Telegram bot (refer to the documentation to learn how to create a Telegram bot command). - Updates: message
2. IF node
Add an IF node that checks if the incoming message contains the /deploy command:
- Value 1: {{$json["message"]["text"]}}
- Operation: contains
- Value 2: /deploy
3. Set node
Connect a Set node to the true output of the IF node and configure the parameters:
- Keep Only Set: Toggle to true
This option will return the values we configure in the Set node. - Name: the name of your version
- Value: {{$json["message"]["text"].split(' ')[1]}}
4. GitHub node
Add a GitHub node and configure the parameters:
- Github OAuth2 API: Enter your credentials (follow the steps mentioned in the documentation to learn how to get your credentials).
- Authentication:
- Resource: Release
- Operation: Create
- Repository Owner: the name of the repository owner (e.g. n8n-io)
- Repository Name: the name of the repository you want to use (e.g. n8n)
- Tag: {{$json["version"]}}
You can select this expression by clicking on: Current Node > Input Data > JSON > version
5. NoOp node
This step is optional and only to show that you can continue the workflow in this direction. Connect a No Operation, do nothing node to the false output of the IF node.
You can build a similar workflow for your repository hosted on GitLab by simply replacing the GitHub node with the GitLab node.
Trigger GitHub Actions
If you’re using GitHub Actions for deployment, you can trigger the GitHub Actions workflow. Your GitHub Action should have the trigger type repository_dispatch. You can learn more about the repository_dispatch type on the official GitHub documentation page.
To trigger this GitHub Action from n8n, you can use the HTTP Request node configured like this:
- Authentication: Header Auth
In the Authentication window, set:
- Name: Enter Authorization
- Value: Enter Bearer and paste your Access Token - Request Method: POST
- URL: https://api.github.com/repos/<USERNAME>/<REPO>/
Replace <USERNAME> and <REPO> with the repository owner name and the repository name, respectively. - Click on Add Parameter under the Body Parameters section to add a parameter with:
- Name: event_type
- Value: the event type
Though Continuous Delivery involves human intervention, you can automate the repetitive parts. This strategy will save you a lot of time and help your team focus on adding new features.
What is Continuous Deployment (CD)?
Just like Continuous Delivery, Continuous Deployment is another step after Continuous Integration. The difference between Continuous Delivery and Continuous Deployment is that in continuous delivery, human interaction is needed (you deploy the application manually), while in continuous deployment the application gets deployed automatically (assuming all the automated tests pass successfully).
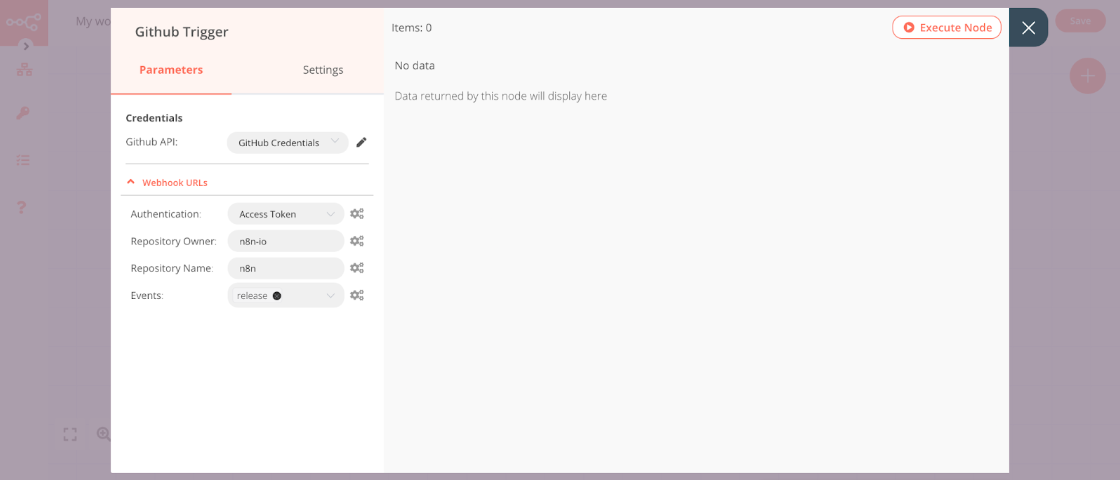
Based on your CI/CD pipeline, you can build a workflow in n8n that can automatically deploy your application. Let’s say you want to deploy your application whenever a new version is released. You can use the GitHub Trigger node to trigger this workflow. In the Events dropdown list, select release.
If you’re using GitHub Actions, you can trigger the GitHub Action workflow, as mentioned in the above section. The next node in this workflow depends on the platform you use to deploy your application. If you don’t find the node for your platform, you can use the HTTP Request node to make an API call.
What’s next?
In this article, you learned what CI/CD is, what are the advantages of this DevOps practice, and how you can build a CI/CD pipeline in n8n.
Now it’s your turn: start by writing tests for your application (most of the programming languages have a testing framework for this), then implement the workflows presented in this article for your personal use case. You can extend and tweak them how you like. For example, you could:
- add the Slack node, Mattermost node, or the Telegram node that sends you a message whenever the pipeline starts).
- use the Webhook node to trigger the workflow if the tests fail or pass. If the tests fail, your workflow can create a ticket on Jira and send a message to your team. If the tests pass, you can automate the release process of your application.
Start automating!
The best part is, you can start automating for free with n8n. The easiest way to get started is to download the desktop app, or sign up for a free n8n cloud trial. Thanks to n8n’s fair-code license, you can also self-host n8n for free.
I’d like to know how you are using CI/CD in your software development life cycle! Will you consider implementing a CI/CD pipeline in n8n, now that you know how? Feel free to message me on Twitter or discuss on our forum 🧡 And if you want to get the latest content on automation, subscribe to our newsletter 💌


