Back to Templates


Community Node Disclaimer: This workflow uses KlickTipp community nodes.
Introduction
This workflow creates a complete two-way synchronization between KlickTipp and Google Calendar.
When a contact in KlickTipp is tagged, an event is automatically created in Google Calendar.
If event status changes or if attendees respond, their RSVP status and event status are reflected in KlickTipp — keeping your contact database, campaigns, and event insights always up to date.
Perfect for marketers, coaches, or event organizers who want to automatically send event invites and instantly capture participation status without manual updates.
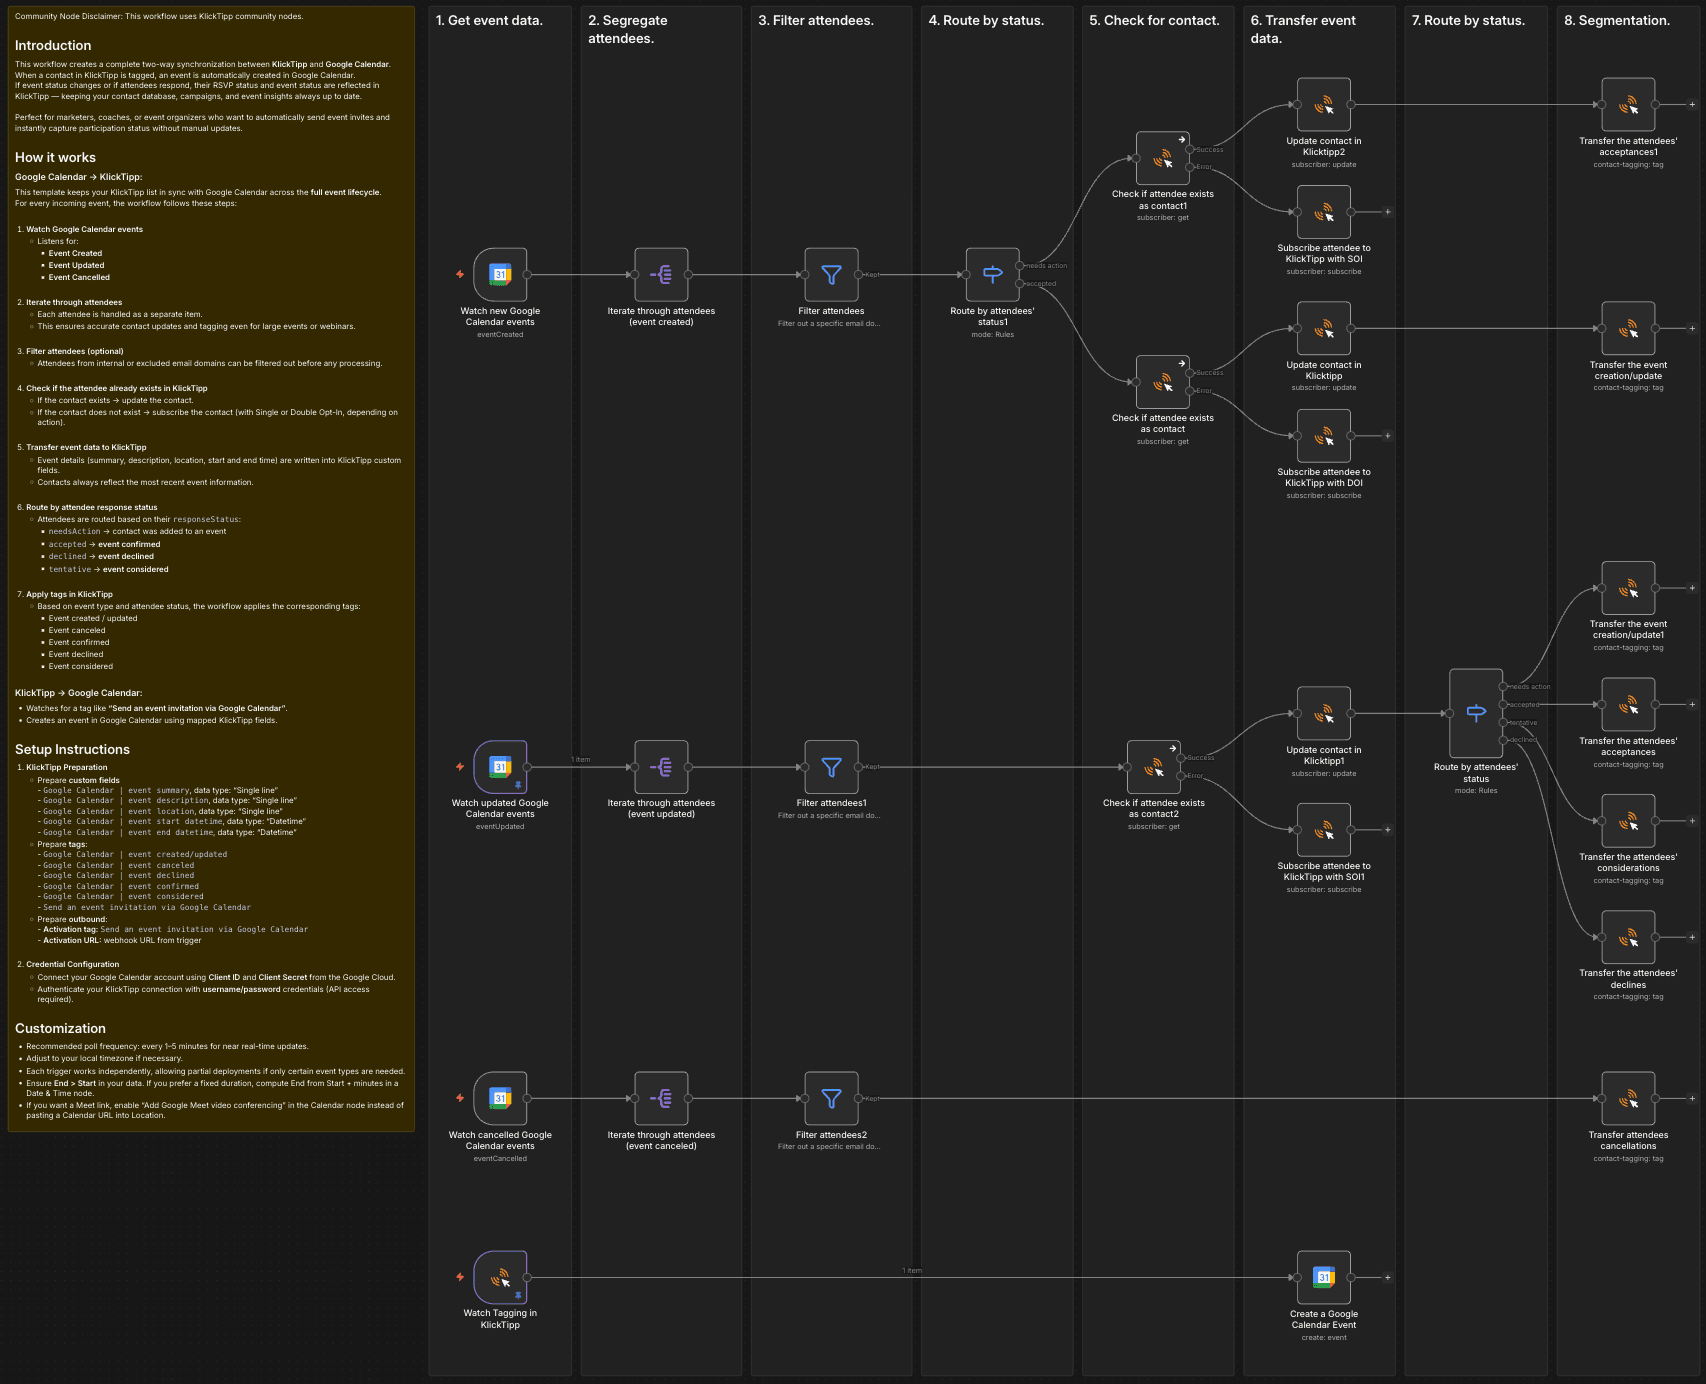
How it works
Google Calendar → KlickTipp:
This template keeps your KlickTipp list in sync with Google Calendar across the full event lifecycle.
For every incoming event, the workflow follows these steps:
-
Watch Google Calendar events
- Listens for:
- Event Created
- Event Updated
- Event Cancelled
- Listens for:
-
Iterate through attendees
- Each attendee is handled as a separate item.
- This ensures accurate contact updates and tagging even for large events or webinars.
-
Filter attendees (optional)
- Attendees from internal or excluded email domains can be filtered out before any processing.
-
Check if the attendee already exists in KlickTipp
- If the contact exists → update the contact.
- If the contact does not exist → subscribe the contact (with Single or Double Opt-In, depending on action).
-
Transfer event data to KlickTipp
- Event details (summary, description, location, start and end time) are written into KlickTipp custom fields.
- Contacts always reflect the most recent event information.
-
Route by attendee response status
- Attendees are routed based on their
responseStatus:needsAction→ contact was added to an eventaccepted→ event confirmeddeclined→ event declinedtentative→ event considered
- Attendees are routed based on their
-
Apply tags in KlickTipp
- Based on event type and attendee status, the workflow applies the corresponding tags:
- Event created / updated
- Event canceled
- Event confirmed
- Event declined
- Event considered
- Based on event type and attendee status, the workflow applies the corresponding tags:
KlickTipp → Google Calendar:
- Watches for a tag like “Send an event invitation via Google Calendar”.
- Creates an event in Google Calendar using mapped KlickTipp fields.
Setup Instructions
-
KlickTipp Preparation
- Prepare custom fields
-Google Calendar | event summary, data type: "Single line"
-Google Calendar | event description, data type: "Single line"
-Google Calendar | event location, data type: "Single line"
-Google Calendar | event start datetime, data type: "Datetime"
-Google Calendar | event end datetime, data type: "Datetime" - Prepare tags:
-Google Calendar | event created/updated
-Google Calendar | event canceled
-Google Calendar | event declined
-Google Calendar | event confirmed
-Google Calendar | event considered
-Send an event invitation via Google Calendar - Prepare outbound:
- Activation tag:Send an event invitation via Google Calendar
- Activation URL: webhook URL from trigger
- Prepare custom fields
-
Credential Configuration
- Connect your Google Calendar account using Client ID and Client Secret from the Google Cloud.
- Authenticate your KlickTipp connection with username/password credentials (API access required).
Customization
- Recommended poll frequency: every 1–5 minutes for near real-time updates.
- Adjust to your local timezone if necessary.
- Each trigger works independently, allowing partial deployments if only certain event types are needed.
- Ensure End > Start in your data. If you prefer a fixed duration, compute End from Start + minutes in a Date & Time node.
- If you want a Meet link, enable “Add Google Meet video conferencing” in the Calendar node instead of pasting a Calendar URL into Location.