Back to Templates


Who's it for
This workflow transforms hours of manual video editing into an automated AI-powered pipeline. Perfect for anyone looking to repurpose long-form content into viral short-form clips.
Ideal users include:
- Content Creators - YouTubers producing long-form videos who want to maximize reach by automatically generating TikTok, Reels, and Shorts from their content
- Social Media Managers - Agencies and freelancers handling multiple clients who need to scale clip production without hiring additional editors
- Podcasters - Audio and video podcast hosts wanting to create promotional clips highlighting the best moments from each episode
- Video Editors - Professional editors looking to automate repetitive clipping tasks and focus on creative decisions rather than technical execution
- Marketing Teams - B2B and B2C teams extracting key moments from webinars, product demos, tutorials, and educational content for social campaigns
Whether you're a solo creator or managing content at scale, this workflow saves 5-10 hours per video while maintaining professional quality output.
How it works
This workflow combines AI analysis with professional video editing tools to automatically identify and produce viral-ready clips from any YouTube video.
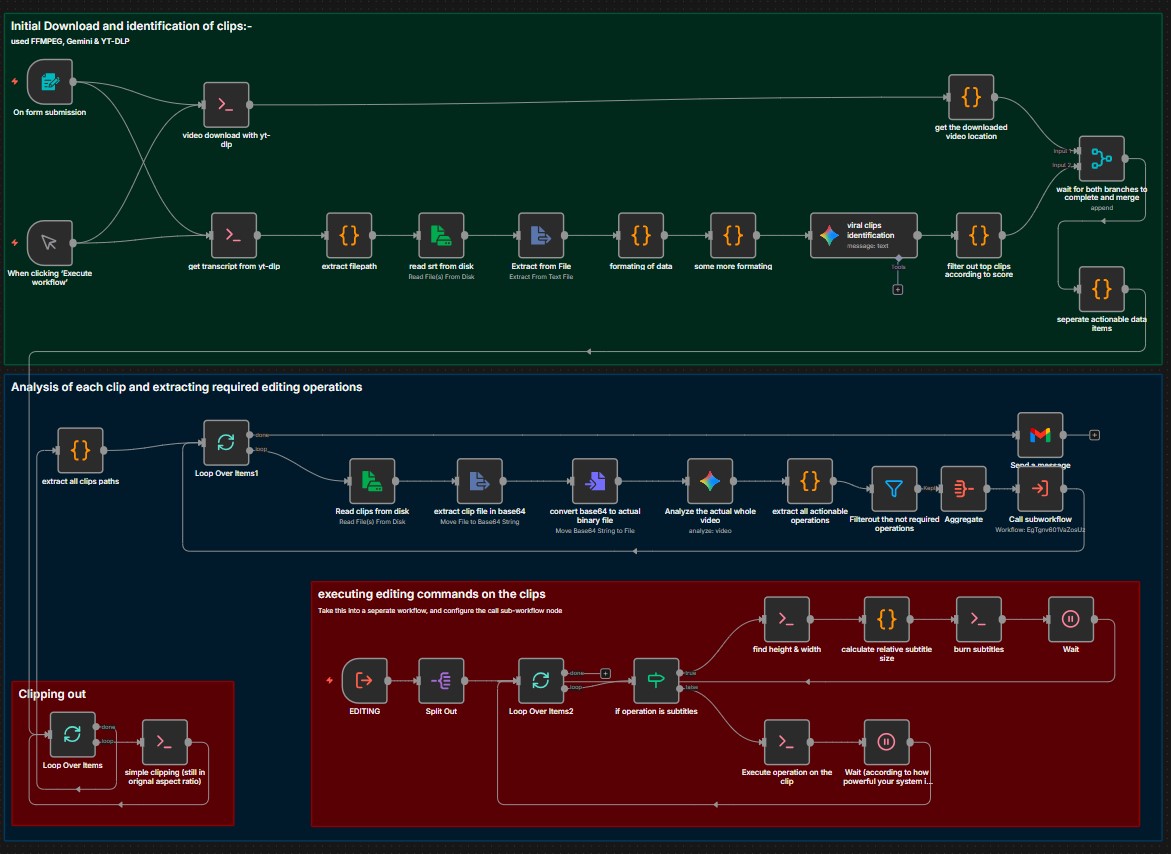
The process flows through three main stages:
Stage 1: Download and Analysis
- Submit a YouTube URL through the built-in form trigger
- yt-dlp simultaneously downloads the video in highest quality and extracts subtitles or auto-generated transcripts
- The transcript is intelligently chunked into 150-segment batches for optimal AI processing
- Each batch is analyzed by Gemini AI using specialized prompts that evaluate viral potential based on hooks, pacing, emotional peaks, and engagement triggers
- AI identifies 3-5 high-quality moments per batch and assigns virality scores to each potential clip
Stage 2: Clip Selection and Extraction
- All AI-identified clips are merged and sorted by their virality scores
- The top 10 candidates are automatically selected for processing
- FFmpeg extracts each clip segment from the original video at precise timestamps
- Clips are processed sequentially to prevent system overload
Stage 3: Professional Editing Pipeline
- Each clip enters a multi-stage editing subworkflow with automated operations:
- Smart 9:16 cropping that intelligently frames the subject for vertical platforms
- Precise trimming to remove dead air and optimize pacing
- Dynamic subtitle generation with sizing calculated based on video resolution
- Professional subtitle styling including bold text, high-contrast colors, strategic positioning, and text wrapping
- Subtitles are burned directly into the video as permanent overlays
Final Delivery:
The workflow processes clips with configurable wait times to match your system's capabilities. When all clips complete processing, you receive an email notification and find your social-ready clips in the /data/clips/ directory, ready for upload to any platform.
Requirements
⚠️ Self-hosted n8n only - This workflow requires command-line access and cannot run on n8n Cloud due to its dependency on system-level tools.
System dependencies you must install:
- FFmpeg - Industry-standard video processing tool for trimming, cropping, and subtitle burning. Install on your n8n host system following this comprehensive guide. Most Linux systems can install via package manager:
apt-get install ffmpegoryum install ffmpeg. - yt-dlp - Advanced YouTube downloader that handles video and subtitle extraction. Follow official installation instructions. Recommended:
pip install yt-dlpor direct binary download. - FFprobe - Usually included with FFmpeg, used for detecting video dimensions for dynamic subtitle sizing.
Credentials needed:
- Google Gemini API account - Powers the AI analysis for clip identification and editing instructions. Get your free API key with generous free tier limits.
- Gmail OAuth2 credentials - Enables email notifications when clips are ready. Set up through n8n's credential system.
Storage requirements:
- Ensure
/data/clips/directory exists with write permissions - Plan for 2-3x the original video size in temporary storage during processing
- Final clips typically use 10-30% of original video size
How to set up
Step 1: Install system dependencies
SSH into your n8n host and install required tools. For Ubuntu/Debian systems, run:
apt-get update
apt-get install ffmpeg
pip install yt-dlp
Verify installations by running ffmpeg -version and yt-dlp --version.
Step 2: Configure directory structure
Create the clips output directory with proper permissions:
mkdir -p /data/clips
chmod 755 /data/clips
Step 3: Import the workflow
Download the workflow JSON and import it into your n8n instance. You'll see several sticky notes color-coded by stage: yellow for description, blue for download/analysis, pink for editing operations, and green for clipping.
Step 4: Set up credentials
Navigate to the "viral clips identification" node and add your Google Gemini API credentials. The workflow uses the gemini-2.5-flash model for optimal speed and quality balance. Then configure Gmail OAuth2 in the "Send a message" node following n8n's authentication wizard.
Step 5: Update email notification
Open the "Send a message" node and replace [email protected] with your email address.
Step 6: Create the editing subworkflow
The workflow references a separate subworkflow for the editing pipeline. Create a new workflow in n8n, copy all nodes from the "EDITING" section (between the Execute Workflow Trigger and the final output), and save it. Note the workflow ID from the URL.
Step 7: Link the subworkflow
In the main workflow, open the "Call subworkflow" node and update the workflow ID to match your newly created editing workflow.
Step 8: Test with a short video
Start with a 5-10 minute YouTube video for your first test. Use the manual trigger or form submission. Monitor the execution to ensure all nodes complete successfully and clips appear in /data/clips/.
Step 9: Adjust performance settings
Based on your system's performance during the test, modify the Wait node durations. Systems with 8GB+ RAM and modern CPUs can reduce wait times to 30 seconds. Limited systems should keep 60-second waits or increase them.
How to customize the workflow
Adjust clip quantity and quality thresholds
Open the "filter out top clips according to score" node. The code currently uses .slice(0, 10) to select the top 10 clips. Change this number based on your needs: use .slice(0, 5) for only the best clips, or .slice(0, 20) for more options. You can also add score filtering by adding results.filter(c => c.score > 0.7) before the slice operation to only include clips with virality scores above 70%.
Customize subtitle appearance
Navigate to the "calculate relative subtitle size" node. The JavaScript code defines several styling variables you can modify:
fontSize- Currently calculated dynamically, but you can hardcode it:const fontSize = 48;fontName- Change from Arial to any system font:const fontName = 'Impact';primaryColor- Modify text color using BGR hex format:'&H00FF00&'for green,'&HFF0000&'for redborderColor- Adjust outline color for better contrastoutlineWidth- Increase from 1 to 2 or 3 for thicker bordersmarginV- Control vertical position (higher values move text up from bottom)
Modify AI analysis prompts
In the "viral clips identification" node, edit the Gemini prompt to target specific content types. For educational content, add "Focus on key teaching moments and actionable tips." For entertainment, emphasize "Identify funny moments, reactions, and unexpected events." For podcast clips, specify "Extract controversial opinions, storytelling segments, and quotable statements."
Change aspect ratios
The workflow defaults to 9:16 for vertical video. To create horizontal clips for YouTube or other platforms, open the "Analyze the actual whole video" node and change the aspect ratio in the JSON schema from "aspect_ratio": "9:16" to "aspect_ratio": "16:9". The AI will automatically adjust cropping coordinates accordingly.
Enable audio normalization
By default, audio normalization is disabled for faster processing. To enable it, open the "extract all actionable operations" node, find the audio_normalize task object, and change enabled: false to enabled: true. This ensures consistent volume levels across all clips but adds processing time.
Add custom editing operations
The editing pipeline is modular. You can add new operations like:
- Color grading by inserting FFmpeg color filters
- Logo overlays by adding watermark commands
- Intro/outro sequences by concatenating video files
- Background music by mixing audio tracks
Add these as new task objects in the "extract all actionable operations" node following the existing pattern.
Customize notification content
Open the "Send a message" node to modify the email subject, body text, or add clip details. You can include clip metadata like timestamps, scores, and descriptions using expressions like {{ $json.hook }} or {{ $json.score }}.
Integrate with cloud storage
Add nodes after clip generation to automatically upload finished clips to Google Drive, Dropbox, AWS S3, or any n8n-supported storage service. Use the Loop Over Items1 output to access completed clip file paths.
Schedule automated processing
Replace the Form Trigger with a Schedule Trigger to automatically process videos from a spreadsheet or RSS feed. Combine with Google Sheets integration to maintain a queue of videos to process overnight.