Back to Templates


Export Google Search Console Data to Airtable Automatically
If you’ve ever downloaded CSV files from Google Search Console, opened them in Excel, cleaned the weird formatting, and pasted them into a sheet just to get a simple report… this workflow is made for you.
Who Is This Workflow For?
This automation is perfect for:
- SEO freelancers and consultants → who want to track client performance without wasting time on manual exports.
- Marketing teams → who need fresh daily/weekly reports to check what keywords and pages are performing.
- Website owners → who just want a clean way to see how their site is doing without logging into Google Search Console every day.
Basically, if you care about SEO but don't want to babysit CSV files, this workflow is your new best friend.
If you need a professional n8n agency to build advanced data automation workflows like this, check out Vision IA's n8n automation services.
What Does It Do?
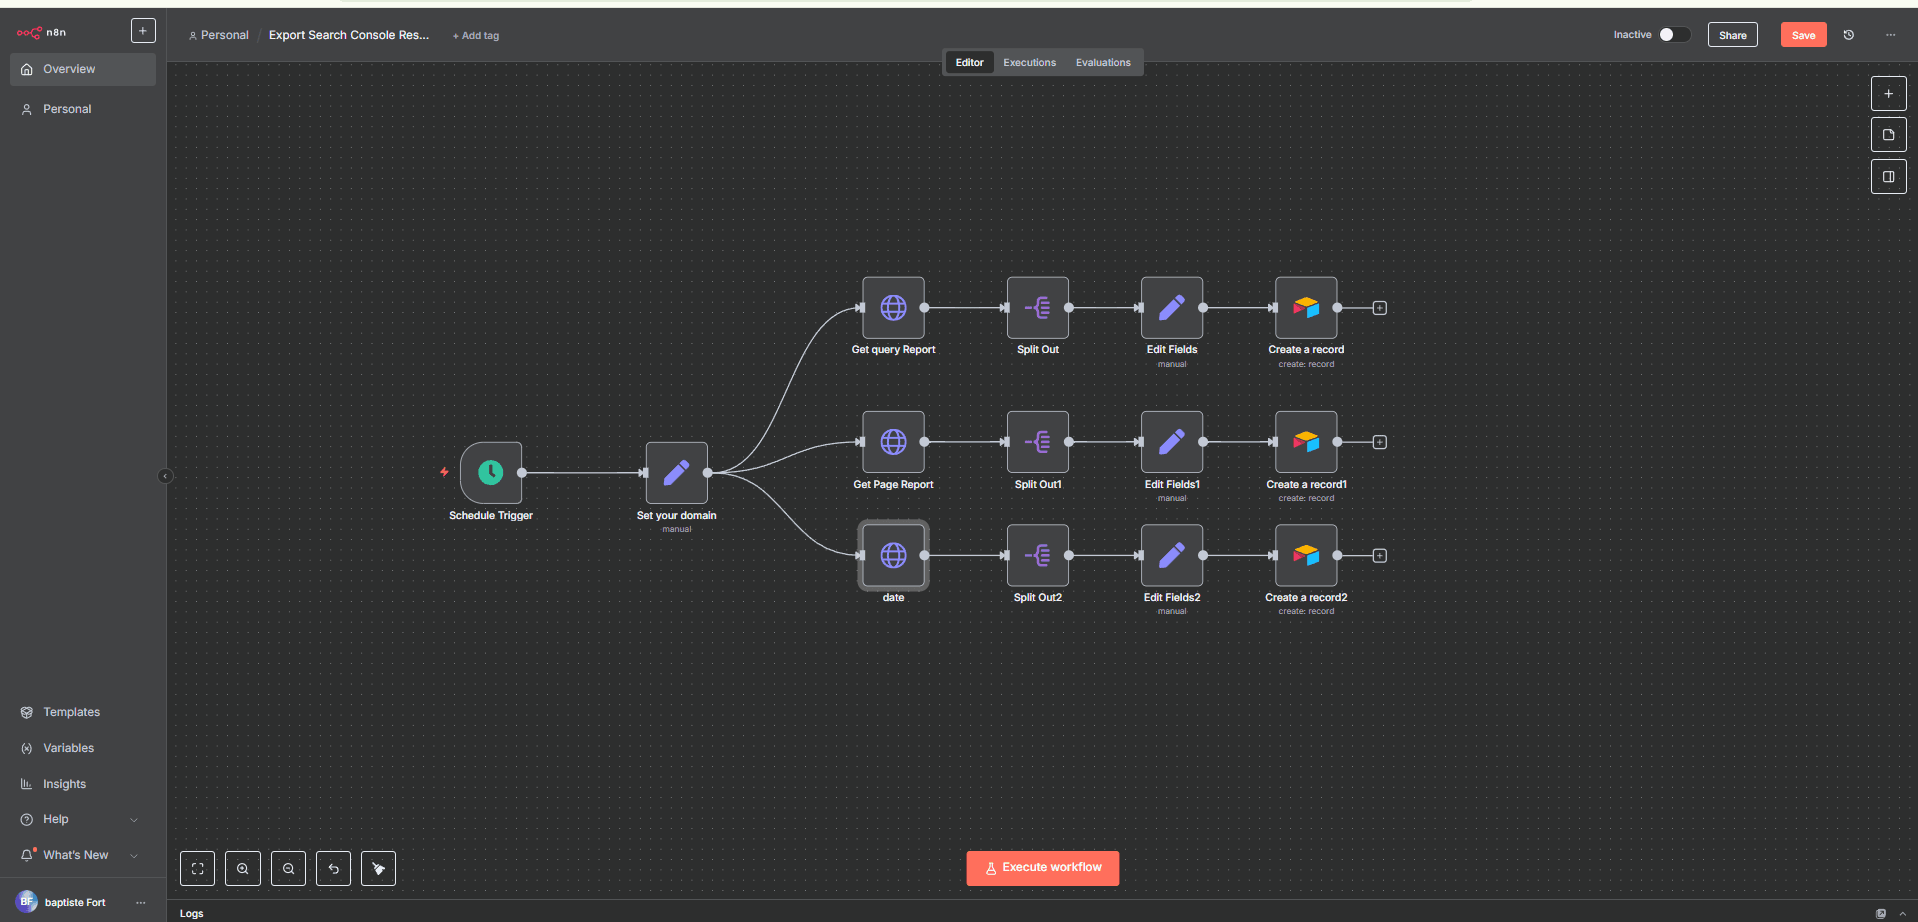
Here’s the big picture:
- It runs on a schedule (every day, or whenever you want).
- It fetches data directly from the Google Search Console API.
- It pulls 3 types of reports:
- By Query (keywords people used).
- By Page (URLs that ranked).
- By Date (daily performance).
- It splits and cleans the data so it’s human-friendly.
- It saves everything into Airtable, organized in three tables.
End result: every time you open Airtable, you have a neat SEO database with clicks, impressions, CTR, and average position — no manual work required.
Prerequisites
You’ll need a few things to get started:
- Access to Google Search Console.
- A Google Cloud project with the Search Console API enabled.
- An Airtable account to store the data.
- An automation tool that can connect APIs (like the one we’re using here).
That’s it!
Step 1: Schedule the Workflow
The very first node in the workflow is the Schedule Trigger.
- Why? → So you don’t have to press “Run” every day.
- What it does → It starts the whole workflow at fixed times.
In the JSON, you can configure things like:
- Run every day at a specific hour (e.g., 8 AM).
- Or run every X hours/minutes if you want more frequent updates.
This is the alarm clock of your automation ⏰.
Step 2: Set Your Domain and Time Range
Next, we define the site and the time window for the report.
In the JSON, there’s a Set node with two important parameters:
domain→ your website (example:https://www.vvv.fr/).days→ how many days back you want the data (default: 30).
👉 Changing these two values updates the whole workflow. Super handy if you want 7-day reports instead of 30.
Step 3: Fetch Data from Google Search Console
This is where the workflow talks to the API.
There are 3 HTTP Request nodes:
-
Get Query Report
- Pulls data grouped by search queries (keywords).
- Parameters in the JSON:
startDate= today - 30 daysendDate= todaydimensions="query"rowLimit=25000(maximum rows the API can return)
-
Get Page Report
- Same idea, but grouped by page URLs.
- Parameters:
dimensions="page"- Same dates and row limit.
-
Get Date Report
- This one groups performance by date.
- Parameters:
dimensions="date"- You get a day-by-day performance view.
Each request returns rows like this:
{
"keys": ["example keyword"],
"clicks": 42,
"impressions": 1000,
"ctr": 0.042,
"position": 8.5
}
Step 4: Split the Data
The API sends results in a big array (rows). That’s not very usable directly.
So we add a Split Out node for each report.
What it does: breaks the array into single items → 1 item per keyword, per page, or per date.
This way, each line can be saved individually into Airtable.
👉 Think of it like opening a bag of candy and laying each one neatly on the table 🍬.
Step 5: Clean and Rename Fields
After splitting, we use Edit Fields nodes to make the data human-friendly.
For example:
- In the Query report → rename
keys[0]intoKeyword. - In the Page report → rename
keys[0]intopage. - In the Date report → rename
keys[0]intodate.
This is also where we keep only the useful fields:
Keyword/page/dateclicksimpressionsctrposition
Step 6: Save Everything into Airtable
Finally, the polished data is sent into Airtable.
In the JSON, there are 3 Airtable nodes:
- Queries table → stores all the keywords.
- Pages table → stores all the URLs.
- Dates table → stores day-by-day metrics.
Each node is set to:
- Operation =
Create→ adds a new record. - Base =
Search Console Reports. - Table =
Queries,Pages, orDates.
Field Mapping
For Queries:
Keyword→{{ $json.Keyword }}clicks→{{ $json.clicks }}impressions→{{ $json.impressions }}ctr→{{ $json.ctr }}position→{{ $json.position }}
👉 Same logic for Pages and Dates, just replace Keyword with page or date.
Expected Output
Every time this workflow runs:
- Queries table fills with fresh keyword performance data.
- Pages table shows how your URLs performed.
- Dates table tracks the evolution day by day.
In Airtable, you now have a complete SEO database with no manual exports.
Why This Is Awesome
- 🚫 No more messy CSV exports.
- 📈 Data is always up-to-date.
- 🎛 You can build Airtable dashboards, filters, and interfaces.
- ⚙️ Easy to adapt → just change
domainordaysto customize.
And the best part? You can spend the time you saved on actual SEO improvements instead of spreadsheet gymnastics 💃.
Need Help Automating Your Data Workflows?
This n8n workflow is perfect for automating SEO reporting and data collection. If you want to go further with document automation, file processing, and data synchronization across your tools, our agency specializes in building custom automation systems.
👉 Explore our document automation services: Vision IA – Document Automation Agency
We help businesses automate their data workflows—from collecting reports to organizing files and syncing information across CRMs, spreadsheets, and databases—all running automatically.
Questions about this workflow or other automation solutions? Visit Vision IA or reach out for a free consultation.