Back to Integrations
integrationHTTP Request node
integrationSlack node

HTTP Request and Slack integration

Save yourself the work of writing custom integrations for HTTP Request and Slack and use n8n instead. Build adaptable and scalable Development, Core Nodes, and Communication workflows that work with your technology stack. All within a building experience you will love.

How to connect HTTP Request and Slack

  • Step 1: Create a new workflow
  • Step 2: Add and configure nodes
  • Step 3: Connect
  • Step 4: Customize and extend your integration
  • Step 5: Test and activate your workflow

Step 1: Create a new workflow and add the first step

In n8n, click the "Add workflow" button in the Workflows tab to create a new workflow. Add the starting point – a trigger on when your workflow should run: an app event, a schedule, a webhook call, another workflow, an AI chat, or a manual trigger. Sometimes, the HTTP Request node might already serve as your starting point.

HTTP Request and Slack integration: Create a new workflow and add the first step

Step 2: Add and configure HTTP Request and Slack nodes

You can find HTTP Request and Slack in the nodes panel. Drag them onto your workflow canvas, selecting their actions. Click each node, choose a credential, and authenticate to grant n8n access. Configure HTTP Request and Slack nodes one by one: input data on the left, parameters in the middle, and output data on the right.

HTTP Request and Slack integration: Add and configure HTTP Request and Slack nodes

Step 3: Connect HTTP Request and Slack

A connection establishes a link between HTTP Request and Slack (or vice versa) to route data through the workflow. Data flows from the output of one node to the input of another. You can have single or multiple connections for each node.

HTTP Request and Slack integration: Connect HTTP Request and Slack

Step 4: Customize and extend your HTTP Request and Slack integration

Use n8n's core nodes such as If, Split Out, Merge, and others to transform and manipulate data. Write custom JavaScript or Python in the Code node and run it as a step in your workflow. Connect HTTP Request and Slack with any of n8n’s 1000+ integrations, and incorporate advanced AI logic into your workflows.

HTTP Request and Slack integration: Customize and extend your HTTP Request and Slack integration

Step 5: Test and activate your HTTP Request and Slack workflow

Save and run the workflow to see if everything works as expected. Based on your configuration, data should flow from HTTP Request to Slack or vice versa. Easily debug your workflow: you can check past executions to isolate and fix the mistake. Once you've tested everything, make sure to save your workflow and activate it.

HTTP Request and Slack integration: Test and activate your HTTP Request and Slack workflow

Back Up Your n8n Workflows To Github

This workflow will backup your workflows to Github. It uses the public api to export all of the workflow data using the n8n node.

It then loops over the data checks in Github to see if a file exists that uses the workflow name. Once checked it will then update the file on Github if it exists, Create a new file if it doesn't exist and if it's the same it will ignore the file.

Config Options

repo_owner - Github owner

repo_name - Github repository name

repo_path - Path within the Github repository

>This workflow has been updated to use the n8n node and the code node so requires at least version 0.198.0 of n8n

Nodes used in this workflow

Popular HTTP Request and Slack workflows

n8n node
+5

Back Up Your n8n Workflows To Github

This workflow will backup your workflows to Github. It uses the public api to export all of the workflow data using the n8n node. It then loops over the data checks in Github to see if a file exists that uses the workflow name. Once checked it will then update the file on Github if it exists, Create a new file if it doesn't exist and if it's the same it will ignore the file. Config Options repo_owner - Github owner repo_name - Github repository name repo_path - Path within the Github repository >This workflow has been updated to use the n8n node and the code node so requires at least version 0.198.0 of n8n
Code node
Embeddings OpenAI node
+5

Advanced AI Demo (Presented at AI Developers #14 meetup)

This workflow was presented at the AI Developers meet up in San Fransico on 24 July, 2024. AI workflows Categorize incoming Gmail emails and assign custom Gmail labels. This example uses the Text Classifier node, simplifying this usecase. Ingest a PDF into a Pinecone vector store and chat with it (RAG example) AI Agent example showcasing the HTTP Request tool. We teach the agent how to check availability on a Google Calendar and book an appointment.
Code node
Merge node
Slack node
+4

Phishing Analysis - URLScan.io and VirusTotal

This n8n workflow automates the analysis of email messages received in a Microsoft Outlook inbox to identify indicators of compromise (IOCs), specifically suspicious URLs. It can be triggered manually or scheduled to run daily at midnight. The workflow begins by retrieving up to 100 read email messages from the Outlook inbox. However, there seems to be a configuration issue as it should retrieve unread messages, not read ones. It then marks these messages as read to avoid processing them again in the future. The messages are then split into individual items using the Split In Batches node for sequential processing. For each email, the workflow analyzes its content to find URLs, which are considered potential IOCs. If URLs are found, the workflow proceeds to check these URLs for potential threats using two services, URLScan.io and VirusTotal, in parallel. In the first path, URLScan.io scans each URL, and if there are no errors, the results from URLScan.io and VirusTotal are merged. If there are errors, the workflow waits 1 minute before attempting to retrieve the URLScan results again. The loop then continues for the next email. In the second path, VirusTotal is used to scan the URLs, and the results are retrieved. Finally, the workflow checks if the data field is not empty, filtering out items where no data was found. It then sends a summarized Slack message to report details about the analyzed email, including the subject, sender, date, URLScan report URL, and VirusTotal verdict for URLs that were reported as malicious. Potential issues during setup include configuring the Outlook node to retrieve unread messages, resolving a configuration issue in the VirusTotal node, and handling authentication and API keys for both URLScan.io and VirusTotal nodes. Additionally, proper error handling and testing with various email content types and URLs are essential to ensure the workflow accurately identifies IOCs and reports them to the Slack channel.
Google Sheets node
Slack node
Gmail node
+4

Host your own Uptime Monitoring with Scheduled Triggers

This n8n workflow demonstrates how to build a simple uptime monitoring service using scheduled triggers. Useful for webmasters with a handful of sites who want a cost-effective solution without the need for all the bells and whistles. How it works Scheduled trigger reads a list of website urls in a Google Sheet every 5 minutes Each website url is checked using the HTTP node which determines if the website is either in the UP or DOWN state. An email and Slack message are sent for websites which are in the DOWN state. The Google Sheet is updated with the website's state and a log created. Logs can be used to determine total % of UP and DOWN time over a period. Requirements Google Sheet for storing websites to monitor and their states Gmail for email alerts Slack for channel alerts Customising the workflow Don't use Google Sheets? This can easily be exchanged with Excel or Airtable.
Slack node
HTTP Request node
+5

🤖 Advanced Slackbot with n8n

Use case Slackbots are super powerful. At n8n, we have been using them to get a lot done.. But it can become hard to manage and maintain many different operations that a workflow can do. This is the base workflow we use for our most powerful internal Slackbots. They handle a lot from running e2e tests for Github branch to deleting a user. By splitting the workflow into many subworkflows, we are able to handle each command seperately, making it easier to debug as well as support new usecases. In this template, you can find eveything to setup your own Slackbot (and I made it simple, there's only one node to configure 😉). After that, you need to build your commands directly. This bot can create a new thread on an alerts channel and respond there. Or reply directly to the user. It responds for help request to return a help page. It automatically handles unknown commands. It also supports flags and environment variables. For example /cloudbot-test info mutasem --full-info -e env=prod would give you the following info, when calling subworkflow. How to setup Add Slack command and point it up to the webhook. For example. Add the following to the Set config node alerts_channel with alerts channel to start threads on instance_url with this instance url to make it easy to debug slack_token with slack bot token to validate request slack_secret_signature with slack secret signature to validate request help_docs_url with help url to help users understand the commands Build other workflows to call and add them to commands in Set Config. Each command must be mapped to a workflow id with an Execute Workflow Trigger node Activate workflow 🚀 How to adjust Add your own commands. Depending on your need, you might need to lock down who can call this.
Code node
Gmail node
+5

URL and IP lookups through Greynoise and VirusTotal

This n8n workflow serves as a powerful cybersecurity and threat intelligence tool to look up URLs or IP addresses through industry standard threat intelligence vendors. It starts with either a form submission or a webhook trigger, allowing users to input data, URLs or IPs that require analysis. The workflow then splits into two paths depending on whether the input data is an IP or URL. If an IP was given, it sets the ip variable to the IP; however if a URL was given the workflow will perform a DNS lookup using Google Public DNS and sets the ip variable based on the results from Google. The workflow then checks the obtained IP addresses against GreyNoise services, with one branch utilizing GreyNoise RIOT IP Lookup to assess IP reputation and association with known benign services, and the other using GreyNoise IP Context to evaluate potential threats. The results from both GreyNoise services are merged to create a comprehensive analysis which includes the IP, classification (benign, malicious, or unknown), IP location, tags to identify activity or malware, category, and trust level. In parallel, a VirusTotal scan is initiated for the URL/IP to identify if it is malicious. A 5-second wait ensures proper processing, and the workflow subsequently polls the scan result to determine when the analysis is complete. The workflow then summarizes the analysis including the overall security vendor analysis results, blockList analysis, OpenPhish analysis, the URL, and the IP. Finally, the workflow combines the summarized intelligence from both GreyNoise and VirusTotal to provide a thorough analysis of the URL/IP. This summarized intelligence can then be emailed to the user that filled out the form via Gmail or it can be sent to the user via a Slack message. Setting up this workflow may require proper configuration of the form submission or webhook trigger, and ensuring that the GreyNoise and VirusTotal API credentials are correctly integrated. Users should also consider the potential volume of data and API rate limits, as excessive requests could lead to issues. Proper documentation and validation of input data are crucial to ensure accurate and meaningful results in the final report.
Code node
HTML node
Gmail node
+5

Suspicious Login Detection

This n8n workflow is designed for security monitoring and incident response when suspicious login events are detected. It can be initiated either manually from within the n8n UI for testing or automatically triggered by a webhook when a new login event occurs. The workflow first extracts relevant data from the incoming webhook payload, including the IP address, user agent, timestamp, URL, and user ID. It then splits into three parallel processing paths. In the first path, it queries GreyNoise's Community API to retrieve information about the investigated IP address. Depending on the classification and trust level received from GreyNoise, the alert is given a High, Medium, or Low priority. This priority is assigned based on the best practices documentation from GreyNoise on how to apply their data to analysis. Once a priority is assigned, a message is sent to a Slack channel to notify users about the alert. The second path involves fetching geolocation data about the IP address using IP-API's Geolocation API and merging it with data from the UserParser node. This data is then combined with the data obtained from GreyNoise. In the third path, the UserParser node queries the Userparser IP address and user agent lookup API to obtain information about the user's IP and user agent. This data is merged with the IP-API data and GreyNoise data. The workflow then checks if the IP address is considered an unknown threat by examining both the noise and riot fields from GreyNoise. If it is considered an unknown threat, the workflow proceeds to retrieve the last 10 login records for the same user from a Postgres database. If there are any discrepancies in the login information, indicating a new location or device/browser, the user is informed via email. Potential issues when setting up this workflow include ensuring that credentials are correctly entered for GreyNoise and UserParser nodes, and addressing any discrepancies in the data sources that could lead to false positives or negatives in threat detection. Additionally, the usage of hardcoded API keys should be replaced with credentials for security and flexibility. Thorough testing and validation with sample data are crucial to ensure the workflow performs as expected and aligns with security incident response procedures.
HTTP Request node
Merge node
Slack node
HubSpot node
+3

lemlist <> GPT-3: Supercharge your sales workflows

Use GPT-3 to classify email responses in lemlist. And automate: Slack alerts when a lead is interested the creation of tasks when a lead is OOO unsubscription of leads when they request it
Jira Software node
Slack node
Item Lists node
+2

Analyze CrowdStrike Detections - Search for IOCs in VirusTotal - Create a Ticket in Jira, and Post a Message in Slack

This n8n workflow automates the handling of security detections from CrowdStrike, streamlining incident response and notification processes. The workflow is triggered daily at midnight by the Schedule Trigger node. It begins by fetching recent security detections from CrowdStrike using an HTTP Request node. The response is then split into individual detections for further processing. Each detection is enriched by querying the CrowdStrike API for detailed information using another HTTP Request node. The workflow then processes these detections sequentially using the Split In Batches node. Next, it looks up behavioral information associated with each detection in VirusTotal using two HTTP Request nodes. One node queries VirusTotal based on SHA256 values, and the other based on IOC (Indicator of Compromise) values. The workflow includes a 1-second pause using the Wait node to prevent rate limiting when making requests to the VirusTotal API. Subsequently, the workflow sets fields with relevant details from both CrowdStrike and VirusTotal, including detection links, confidence scores, filenames, usernames, and more. These details are concatenated using an Item Lists node for each detection. The final step involves creating Jira issues for each detection, including summaries with CrowdStrike alert severity and hostnames, as well as descriptions that incorporate information from CrowdStrike and VirusTotal. Information about this issue is then sent via a Slack message to a Slack user. Potential issues during setup might include configuring the Schedule Trigger node to trigger at the correct time zone and handling potential rate limiting from the VirusTotal API, which could lead to throttled requests. Additionally, the note about a possible typo in the URL for the Virustotal nodes should be addressed to ensure correct API calls. The Jira node may need to be replaced with the latest version for compatibility. Properly configuring API credentials and handling errors that may occur during API requests are essential for a smooth workflow operation. Careful testing with sample data is recommended to validate the workflow's functionality and ensure it aligns with your organization's security incident response processes.
Aggregate node
Postgres node
HTTP Request node
+5

Enrich up to 1500 emails per hour with Dropcontact batch requests

The template allows to make Dropcontact batch requests up to 250 requests every 10 minutes (1500/hour). Valuable if high volume email enrichment is expected. Dropcontact will look for email & basic email qualification if first_name, last_name, company_name is provided. +++++++++++++++++++++++++++++++++++++++++ Step 1: Node "Profiles Query" Connect your own source (Airtable, Google Sheets, Supabase,...) the template is using Postgres by default. Note I: Be careful your source is only returning a maximum of 250 items. Note II: The next node uses the next variables, make sure you can map these from your source file: first_name last_name website (company_name would work too) full_name (see note) Note III: This template is using the Dropcontact Batch API, which works in a POST & GET setup. Not a GET request only to retrieve data, as Dropcontact needs to process the batch data load properly. +++++++++++++++++++++++++++++++++++++++++ Step 2: Node "Data Transformation" Will transform the input variables in the proper json format. This json format is expected from the Dropcontact API to make a batch request. "full_name" is being used as a custom identifier to update the returned email to the proper contact in your source database. To make things easy, use a unique identiefer in the full_name variable. +++++++++++++++++++++++++++++++++++++++++ Step3: Node: "Bulk Dropcontact Requests". Enter your Dropcontact credentials in the node: Bulk Dropcontact Requests. +++++++++++++++++++++++++++++++++++++++++ Step4: Connect your output source by mapping the data you like to use. +++++++++++++++++++++++++++++++++++++++++ Step5: Node: "Slack" (OPTIONAL) Connect your slack account, if an error occur, you will be notified. TIP: Try to run the workflow with a batch of 10 (not 250) as it might need to run initially before you will be able to map the data to your final destination. Once the data fields are properly mapped, adjust back to 250.
Code node
HTTP Request node
HTML node
+5

Monitor G2 competitors reviews [Google Sheets, ScrapingBee, Slack]

This workflow monitor G2 reviews URLS. When a new review is published, it will: trigger a Slack notification record the review in Google Sheets To install it, you'll need: access to Slack, Google Sheets and ScrapingBee Full guide here: https://lempire.notion.site/Scrape-G2-reviews-with-n8n-3f46e280e8f24a68b3797f98d2fba433?pvs=4
Split Out node
HTTP Request node
+3

Monitor Multiple Github Repos via Webhook

What this workflow does This workflow allows you to monitor multiple Github repos simultaneously without polling due to use of Webhooks. It programmatically allows for adding and deleting of repos to your watchlist to make management convenient. Description Can monitor multiple repos simultaneously. Programmatically register or unregister repos from a list. No need for manual work. Webhook notification means no constant polling necessary. Setup 1. Creating Credentials on Github Generate a personal access token on github by following these esteps; Right hand side of page -> Settings -> scroll to bottom -> Developer Settings > Personal Access Token > Tokens (classic) > Generate New Token Give scopes: admin:repo_hook repo (if you want to use it for your own private repo) if you need more help, see here: https://docs.github.com/en/authentication/keeping-your-account-and-data-secure/managing-your-personal-access-tokens 2. Setting Credentials in n8n In Register Github Webhook Authenticaion > Generic Credential Type Generic Auth Type > Header Auth Header Auth > Create New Credential with Name set to 'Authorization' and Value set to 'Bearer '. (You can reuse this for Delete Github Webhook and Get Existing Webhooks). Now in Register Github Webhook, scroll down to Send Body > JSON and inside the JSON, change the value of "url" to the webhook address given as Production URL in the node Webhook Trigger. 3. Notification settings In the third row, link up the Webhook Trigger to any API of your choice. Slack and Telegram are given as examples. You can also format the notification message as you wish. Setup time: roughly 10 minutes. Instructions Video: https://vimeo.com/1013473758 Test 1. Register Webhooks In Repos to Monitor, add any repo you want to monitor changes for. Disable Webhook Trigger, Click Test Workflow and if your Github credentials were set correctly, it will automatically register the webhooks. - You can test this by running the single node Get Existing Webhook and confirming it outputs the repo addresses. 2. Handle Github Events Now that you have registered the webhooks, re-enable Webhook Trigger and activate the workflow. Make a commit to any of the registered repos. Confirm that the notification went through. That's it!
HTTP Request node
Slack node

Uploading a file to a Slack channel

This workflow shows you how to post a message to a Slack channel and add a file attachment. It also shows you the general pattern for working with Binary data in n8n (any file like a PDF, Image etc). Specifically, this workflow shows how to download a file from a URL into your workflow, and then upload it to Slack. Video walkthrough Watch this 3 min Loom video for a walkthrough and more context on this general pattern:
Airtable node
HTTP Request node
Code node
Slack node
+2

Airtable - Automate Recurring Tasks

Hello there! This is a supporting workflow for an Airtable Base that handles Recurring Tasks. The objective of the workflow is to handle creating tasks on a recurring basis depending on the Airtable Setup You can access that Airtable Template here for complete context- Airtable Universe The functionality of the workflow can be easliy adapted to any data source. Feel free to contact us with any doubts or questions at http://sidetool.co ​ Use this as is, or adapted to your existing Airtable Base – embrace automated simplicity! 🚀🌟
Slack node
HubSpot node
HTTP Request node
HubSpot Trigger node

Validate website of new companies in Hubspot

This workflow uses a Hubspot Trigger to check for new companies. It then checks the companies website exists using the HTTP node. If it doesn't, a message is sent to Slack. To configure this workflow you will need to set the credentials for the Hubspot and Slack Nodes. You will also need to select the Slack channel to use for sending the message.
Linear Trigger node
Linear node
HTTP Request node
+5

Classify new bugs in Linear with OpenAI's GPT-4 and move them to the right team

Use case When working with multiple teams, bugs must get in front of the right team as quickly as possible to be resolved. Normally this includes a manual grooming of new bugs that have arrived in your ticketing system (in our case Linear). We found this way too time-consuming. That's why we built this workflow. What this workflow does This workflow triggers every time a Linear issue is created or updated within a certain team. For us at n8n, we created one general team called Engineering where all bugs get added in the beginning. The workflow then checks if the issue meets the criteria to be auto-moved to a certain team. In our case, that means that the description is filled, that it has the bug label, and that it's in the Triage state. The workflow then classifies the bug using OpenAI's GPT-4 model before updating the team property of the Linear issue. If the AI fails to classify a team, the workflow sends an alert to Slack. Setup Add your Linear and OpenAi credentials Change the team in the Linear Trigger to match your needs Customize your teams and their areas of responsibility in the Set me up node. Please use the format Teamname. Also, make sure that the team names match the names in Linear exactly. Change the Slack channel in the Set me up node to your Slack channel of choice. How to adjust it to your needs Play around with the context that you're giving to OpenAI, to make sure the model has enough knowledge about your teams and their areas of responsibility Adjust the handling of AI failures to your needs How to enhance this workflow At n8n we use this workflow in combination with some others. E.g. we have the following things on top: We're using an automation that enables everyone to add new bugs easily with the right data via a /bug command in Slack (check out this template if that's interesting to you) This workflow was built using n8n version 1.30.0
Code node
Jira Software node
Slack node
Webhook node
HTTP Request node

Notify User in Slack of Quarantined Email and Create Jira Ticket if Opened

This n8n workflow serves as an incident response and notification system for handling potentially malicious emails flagged by Sublime Security. It begins with a Webhook trigger that Sublime Security uses to initiate the workflow by POSTing an alert. The workflow then extracts message details from Sublime Security using an HTTP Request node, based on the provided messageId, and subsequently splits into two parallel paths. In the first path, the workflow looks up a Slack user by email, aiming to find the recipient of the email that triggered the alert. If a user is found in Slack, a notification is sent to them, explaining that they have received a potentially malicious email that has been quarantined and is under investigation. This notification includes details such as the email's subject and sender. The second path checks whether the flagged email has been opened by inspecting the read_at value from Sublime Security. If the email was opened, the workflow prepares a table summarizing the flagged rules and creates a corresponding issue in Jira Software. The Jira issue contains information about the email, including its subject, sender, and recipient, along with the flagged rules. Issues that someone might encounter when setting up this workflow for the first time include potential problems with the Slack user lookup if the user information is not available or if Slack API integration is not configured correctly. Additionally, the issue creation in Jira Software may not work as expected, as indicated by the note that mentions a need for possible node replacement. Thorough testing and validation with sample data from Sublime Security alerts can help identify and resolve any potential issues during setup.
Code node
Slack node
HTTP Request node
+2

Receive and analyze emails with rules in Sublime Security

This n8n workflow provides a comprehensive automation solution for processing email attachments, specifically targeting enhanced security protocols for organizations that use platforms like Outlook. It starts with the IMAP node, which is set to ingest emails and identify those with .eml attachments. Once an email with an attachment is ingested, the workflow progresses to a conditional operation where it checks for the presence of attachments. If an attachment is found, the binary data is moved and converted to JSON format, preparing it for further analysis. This meticulous approach to detecting attachments is crucial for maintaining a robust security posture, allowing for the proactive identification and handling of potentially malicious content. In the subsequent stage, the workflow leverages the capabilities of Sublime Security by analyzing the email attachment. The binary file is scrutinized for threats, and upon detection, the information is split to matched and unmatched data. This process not only speeds up the threat detection mechanism but also ensures compatibility with other systems, such as Slack, resulting in a smooth and efficient workflow. This automation emphasizes operational efficiency with minimal user involvement, enhancing the organization's defense against cyber threats. The final phase of the workflow involves preparing the output for a Slack report. Whether a threat is detected or not, n8n ensures that stakeholders are immediately informed by dispatching comprehensive reports or notifications to Slack channels. This promotes a culture of transparency and prompt action within the team.
Markdown node
Lemlist Trigger node
OpenAI Chat Model node
+5

Classify lemlist replies using OpenAI and automate reply handling

Who this is for This workflow is for sales people who want to quickly and efficiently follow up with their leads What this workflow does This workflow starts every time a new reply is received in lemlist. It then classifies the response using openAI and creates the correct follow up task. The follow-up tasks currently include: Slack alerts when a lead for each new replies Tag interested leads in lemlist Unsubscription of leads when they request it The Slack alerts include: Lead email address Sender email address Reply type (positive, not interested...etc) A preview of the reply Setup To set this template up, simply follow the stickies steps in it How to customize this workflow to your needs Adjust the follow up tasks to your needs Change the Slack notification to your needs ...
HTTP Request node
Slack node
Webhook node

Replicate Line Items on New Deal in HubSpot and notify with Slack

Replicate Line Items on New Deal in HubSpot Workflow Use Case This workflow solves the problem of manually copying line items from one deal to another in HubSpot, reducing manual work and minimizing errors. What this workflow does Triggers** upon receiving a webhook with deal IDs. Retrieves** the IDs of the won and created deals. Fetches** line items associated with the won deal. Extracts** product SKUs from the retrieved line items. Fetches** product details based on SKUs. Creates** new line items for the created deal and associates them. Sends** a Slack notification with success details. Step up steps Create a HubSpot Deal Workflow 1.1 Set up your trigger (ex: when deal stage = Won) 1.2 Add step : Create Record (deal) 1.3 Add Step : Send webhook. The webhook should be a Get to your n8n first trigger. Set two query parameter : deal_id_won as the Record ID of the deal triggering the HubSpot Workflow deal_id_create as the Record ID of the deal created above. Click Insert Data -&gt; The created object Set up your HubSpot App token in HubSpot -&gt; Settings -&gt; Integration -&gt; Private Apps Set up your HubSpot Token integration using the predefined model. Set up your Slack connection Add an error Workflow to monitor errors
HTTP Request node
Slack node
Google Calendar node
Google Calendar Trigger node

Google Calendar to Slack Status and Philips Hue

I'm currently trialing a 4 day work week for all staff at my company, and one of the major impacts on productivity is interruptions. As such, I opted to use N8N to create a workflow to monitor my Google Calendar and when an event starts, to update my Slack status with an emote and the title of the calendar task. Additionally I opted to include to change the colour of Philips Hue lamp located in my living room where my wife is currently working so she know's if she can interrupt me or not. My calendar is built on the theory behind the Diary Detox system and as such the Slack Status reflect the colours involved. This was achieved using the emote aliases for the relevant colour circles. The Philips Hue lamp status is changed via the local API with Home Assistant. This is a very similiar process to controlling it with something like the Streamdeck, but the workflow calls the Webhook instead of the Streamdeck. This process can be found in lots of Youtube videos such as this. This gives my wife a very quick and easy way to know if she can interrupt me in my office (when the lights are Green or Blue) or when I'm busy (Red). Please Note: The above images are not intended to be an incentive to create your own Squid Games. Additionally, when integrating Slack with N8N, there are 2 x APIs which can be used. Typically the Bot User OAuth Token is used, however in order for your Status to be updated, the User OAuth Token must be used with the users.profile:read and users.profile:write permissions enabled. For clarity, I have removed the Webhooks from the Workflow as this would allow any person to control my lights. These can be inserted in the HTTP Request nodes. Each node responds to a different automation within the Home Assistant infrastructure. Acknowledgement: I would also credit Jon (Discord) aka 8668 (Workflows) for writing the Function node which turns the ColorID into a named variable.
Pipedrive Trigger node
Pipedrive node
Code node
HTTP Request node
+3

Enrich Pipedrive's Organization Data with OpenAI GPT-4o & Notify it in Slack

This workflow enriches new Pipedrive organization's data by adding a note to the organization object in Pipedrive. It assumes there is a custom "website" field in your Pipedrive setup, as data will be scraped from this website to generate a note using OpenAI. Then, a notification is sent in Slack. ⚠️ Disclaimer This workflow uses a scraping API. Before using it, ensure you comply with the regulations regarding web scraping in your country or state. Important Notes The OpenAI model used is GPT-4o, chosen for its large input token capacity. However, it is not the cheapest model if cost is very important to you. The system prompt in the OpenAI Node generates output with relevant information, but feel free to improve or modify it according to your needs. How It Works Node 1: Pipedrive Trigger - An Organization is Created This is the trigger of the workflow. When an organization object is created in Pipedrive, this node is triggered and retrieves the data. Make sure you have a "website" custom field in Pipedrive (the name of the field in the n8n node will appear as a random ID and not with the Pipedrive custom field name). Node 2: ScrapingBee - Get Organization's Website's Homepage Content This node scrapes the content from the URL of the website associated with the Pipedrive Organization created in Node 1. The workflow uses the ScrapingBee API, but you can use any preferred API or simply the HTTP request node in n8n. Node 3: OpenAI - Message GPT-4o with Scraped Data This node sends HTML-scraped data from the previous node to the OpenAI GPT-4o model. The system prompt instructs the model to extract company data, such as products or services offered and competitors (if known by the model), and format it as HTML for optimal use in a Pipedrive Note. Node 4: Pipedrive - Create a Note with OpenAI Output This node adds a Note to the Organization created in Pipedrive using the OpenAI node output. The Note will include the company description, target market, selling products, and competitors (if GPT-4o was able to determine them). Node 5 & 6: HTML To Markdown & Code - Markdown to Slack Markdown These two nodes format the HTML output to Slack Markdown. The Note created in Pipedrive is in HTML format, as specified by the System Prompt of the OpenAI Node. To send it to Slack, it needs to be converted to Markdown and then to Slack Markdown. Node 7: Slack - Notify This node sends a message in Slack containing the Pipedrive Organization Note created with this workflow.
HTTP Request node
Slack node
Code node

Send Slack notifications when a new release is published for public Github repos

This workflow checks a configured list of Github repositories daily to see if a new release has been published. How it works: Workflow has a daily trigger RepoConfig node is a JSON array that defines a list of repositories to check releases for For each of the configured repos it fetches the latest release If the release was published within the last 24 hours it is output The release is sent as a Slack message showing the repo name, release name and link Setup Update the JSON in the RepoConfig node to the Github repos you wish to get notifications for Setup your Slack connection (or replace with your choice of notification)
Clearbit node
Pipedrive node
+5

Enrich new leads in Pipedrive and send an alert to Slack for high-quality ones

Use Case This workflow is beneficial when you're automatically adding new leads to your Pipedrive CRM. Usually, you'd have to manually review each lead to determine if they're a good fit. This process is time-consuming and increases the chances of missing important leads. This workflow ensures every new lead is promptly evaluated upon addition. What this workflow does The workflow runs every 5 minutes. On every run, it checks your new Pipedrive leads and enriches them with Clearbit. It then marks items as enriched and checks if the company of the new lead matches certain criteria (in this case if they are B2B and have more than 100 employees) and sends a Slack alert to a channel for every match. Pre Conditions You must have Pipedrive, Clearbit, and Slack accounts. You also need to set up the custom fields Domain and Enriched at in Pipedrive. Setup Go to Company Settings -&gt; Data fields -&gt; Organization and add Domain as a custom field Go to Company Settings -&gt; Data fields -&gt; Leads and add Enriched at as a custom date field Add your Pipedrive, Clearbit and Slack credentials. Fill the setup node below. To get the ID of your custom domain fields, simply run the Show only custom organization fields and Show only custom lead fields nodes below and copy the keys of your domain, and enriched at fields. How to adjust this workflow to your needs Modify the criteria to suit your definition of an interesting lead. If you only want to focus on interesting leads in Pipedrive, add a node that archives all others. This workflow was built using n8n version 1.29.1
Slack node
n8n Form Trigger node
+2

Qualify great leads from n8n Form with MadKudu and Hunter and alert on Slack

Use case If you have a form where potential leads reach out, then you probably want to analyze those leads and send a notification if certain requirements are met, e.g. employee number is high enough. MadKudu is built exactly to solve this problem. We use it along with Hunter to alert on Slack for high quality leads. How to setup Add you MadKudu, Hunter, and Slack credentials Set the Slack channel Click the Test Workflow button, enter your email and check the Slack channel Activate the workflow and use the form trigger production URL to collect your leads in a smart way How to adjust this template You may want to raise or lower the threshold for your leads, as you see fit.
Venafi TLS Protect Cloud node
Respond to Webhook node
HTTP Request node
+5

Venafi Cloud Slack Cert Bot

Enhance Security Operations with the Venafi Slack CertBot! Venafi Presentation - Watch Video Our Venafi Slack CertBot is strategically designed to facilitate immediate security operations directly from Slack. This tool allows end users to request Certificate Signing Requests that are automatically approved or passed to the Secops team for manual approval depending on the Virustotal analysis of the requested domain. Not only does this help centralize requests, but it helps an organization maintain the security certifications by allowing automated processes to log and analyze requests in real time. Workflow Highlights: Interactive Modals**: Utilizes Slack modals to gather user inputs for scan configurations and report generation, providing a user-friendly interface for complex operations. Dynamic Workflow Execution**: Integrates seamlessly with Venafi to execute CSR generation and if any issues are found, AI can generate a custom report that is then passed to a slack teams channel for manual approval with the press of a single button. Operational Flow: Parse Webhook Data**: Captures and parses incoming data from Slack to understand user commands accurately. Execute Actions**: Depending on the user's selection, the workflow triggers other actions within the flow like automatic Virustotal Scanning. Respond to Slack**: Ensures that every interaction is acknowledged, maintaining a smooth user experience by managing modal popups and sending appropriate responses. Setup Instructions: Verify that Slack and Qualys API integrations are correctly configured for seamless interaction. Customize the modal interfaces to align with your organization's operational protocols and security policies. Test the workflow to ensure that it responds accurately to Slack commands and that the integration with Qualys is functioning as expected. Need Assistance? Explore Venafi's Documentation or get help from the n8n Community for more detailed guidance on setup and customization. Deploy this bot within your Slack environment to significantly enhance the efficiency and responsiveness of your security operations, enabling proactive management of CSR's.
HTTP Request node
Merge node
Code node
+5

Create LinkedIn Contributions with AI and Notify Users On Slack

This workflow automates the process of gathering LinkedIn advice articles, extracting their content, and generating unique contributions for each article using an AI model. The contributions are then posted to a Slack channel and a NocoDB database for record-keeping. The workflow is triggered weekly to ensure new articles are continuously collected and responded to. Who is this for? This workflow is designed for professionals, marketers, and content creators looking to boost their LinkedIn presence by regularly engaging with LinkedIn advice articles. It’s especially useful for those who want to be seen as a "thought leader" or "top voice" in their niche by contributing relevant and unique advice to trending topics. What problem is this workflow solving? Manually searching for relevant LinkedIn articles, reading through them, and crafting thoughtful contributions can be time-consuming. This workflow solves that by automating the process of finding new articles, extracting key content, and generating AI-powered contributions. It helps users stay consistently active on LinkedIn, contributing value to trending discussions. What this workflow does Triggers Weekly: The workflow is set to run every Monday at 8:00 AM. Search Google for LinkedIn Advice Articles: Uses a predefined Google search URL to find the latest LinkedIn advice articles based on the user's area of expertise. Extract LinkedIn Article Links: A code node extracts all LinkedIn advice article links from the search results. Retrieve Article Content: For each article link, the workflow retrieves the HTML content and extracts the article title, topics, and existing contributions. Generate AI-Powered Contributions: The workflow sends the extracted article content to an AI model, which generates unique, helpful advice for each topic within the article. Post to Slack & NocoDB: The AI-generated contributions, along with the article links, are posted to a designated Slack channel and stored in a NocoDB database for future reference. Setup Google Search URL: Update the Google search URL with the relevant LinkedIn advice query for your field (e.g., "site:linkedin.com/advice 'marketing automation'"). Slack Integration: Connect your Slack account and specify the Slack channel where you want the contributions to be posted. NocoDB Integration: Set up your NocoDB project to store the generated contributions along with the article titles and links. How to customize this workflow Change Search Terms**: Modify the Google search URL to focus on a different LinkedIn topic or expertise area. Adjust Trigger Frequency**: The workflow is set to run weekly, but you can adjust the frequency by changing the schedule trigger. Enhance Contribution Quality**: Customize the AI model's prompt to generate contributions that align with your brand voice or content strategy. Workflow Summary This workflow helps users maintain a consistent presence on LinkedIn by automating the discovery of new advice articles and generating unique contributions using AI. It is ideal for professionals who want to engage with LinkedIn content regularly without spending too much time manually searching and drafting responses.
HTTP Request node
+5

Qualys Vulnerability Trigger Scan SubWorkflow

This workflow is triggered by a parent workflow initiated via a Slack shortcut. Upon activation, it collects input from a modal window in Slack and initiates a vulnerability scan using the Qualys API. Key Features Trigger:** Launched by a parent workflow through a Slack shortcut with modal input. API Integration:** Utilizes the Qualys API for vulnerability scanning. Data Conversion:** Converts XML scan results to JSON for further processing. Loop Mechanism:** Continuously checks the scan status until completion. Slack Notifications:** Posts scan summary and detailed results to a specified Slack channel. Workflow Nodes Start VM Scan in Qualys: Initiates the scan with specified parameters. Convert XML to JSON: Converts the scan results from XML format to JSON. Fetch Scan Results: Retrieves scan results from Qualys. Check if Scan Finished: Verifies whether the scan is complete. Loop Mechanism: Handles the repetitive checking of the scan status. Slack Notifications: Posts updates and results to Slack. Relevant Links Qualys API Documentation Qualys Platform Documentation Parent workflow link Link to Report Generator Subworkflow
HTTP Request node
+4

Qualys Scan Slack Report Subworkflow

Introducing the Qualys Scan Slack Report Subworkflow—a robust solution designed to automate the generation and retrieval of security reports from the Qualys API. This workflow is a sub workflow of the Qualys Slack Shortcut Bot workflow. It is triggered when someone fills out the modal popup in slack generated by the Qualys Slack Shortcut Bot. When deploying this workflow, use the Demo Data node to simulate the data that is input via the Execute Workflow Trigger. That data flows into the Global Variables Node which is then referenced by the rest of the workflow. It includes nodes to Fetch the Report IDs and then Launch a report, and then check the report status periodically and download the completed report, which is then posted to Slack for easy access. For Security Operations Centers (SOCs), this workflow provides significant benefits by automating tedious tasks, ensuring timely updates, and facilitating efficient data handling. How It Works Fetch Report Templates:** The "Fetch Report IDs" node retrieves a list of available report templates from Qualys. This automated retrieval saves time and ensures that the latest templates are used, enhancing the accuracy and relevance of reports. Convert XML to JSON:** The response is converted to JSON format for easier manipulation. This step simplifies data handling, making it easier for SOC analysts to work with the data and integrate it into other tools or processes. Launch Report:** A POST request is sent to Qualys to initiate report generation using specified parameters like template ID and report title. Automating this step ensures consistency and reduces the chance of human error, improving the reliability of the reports generated. Loop and Check Status:** The workflow loops every minute to check if the report generation is complete. Continuous monitoring automates the waiting process, freeing up SOC analysts to focus on higher-priority tasks while ensuring they are promptly notified when reports are ready. Download Report:** Once the report is ready, it is downloaded from Qualys. Automated downloading ensures that the latest data is always available without manual intervention, improving efficiency. Post to Slack:** The final report is posted to a designated Slack channel for quick access. This integration with Slack ensures that the team can promptly access and review the reports, facilitating swift action and decision-making. Get Started Ensure your Slack and Qualys integrations are properly set up. Customize the workflow to fit your specific reporting needs. Link to parent workflow Link to Vulnerability Scan Trigger Need Help? Join the discussion on our Forum or check out resources on Discord! Deploy this workflow to streamline your security report generation process, improve response times, and enhance the efficiency of your security operations.

Build your own HTTP Request and Slack integration

Create custom HTTP Request and Slack workflows by choosing triggers and actions. Nodes come with global operations and settings, as well as app-specific parameters that can be configured. You can also use the HTTP Request node to query data from any app or service with a REST API.

Slack supported actions

Archive
Archives a conversation
Close
Closes a direct message or multi-person direct message
Create
Initiates a public or private channel-based conversation
Get
Get information about a channel
Get Many
Get many channels in a Slack team
History
Get a conversation's history of messages and events
Invite
Invite a user to a channel
Join
Joins an existing conversation
Kick
Removes a user from a channel
Leave
Leaves a conversation
Member
List members of a conversation
Open
Opens or resumes a direct message or multi-person direct message
Rename
Renames a conversation
Replies
Get a thread of messages posted to a channel
Set Purpose
Sets the purpose for a conversation
Set Topic
Sets the topic for a conversation
Unarchive
Unarchives a conversation
Get
Get Many
Get & filters team files
Upload
Create or upload an existing file
Delete
Get Permalink
Search
Send
Send and Wait for Approval
Update
Add
Adds a reaction to a message
Get
Get the reactions of a message
Remove
Remove a reaction of a message
Add
Add a star to an item
Delete
Delete a star from an item
Get Many
Get many stars of autenticated user
Get
Get information about a user
Get Many
Get a list of many users
Get User's Profile
Get a user's profile
Get User's Status
Get online status of a user
Update User's Profile
Update a user's profile
Create
Disable
Enable
Get Many
Update
Use case

Save engineering resources

Reduce time spent on customer integrations, engineer faster POCs, keep your customer-specific functionality separate from product all without having to code.

Learn more

FAQs

  • Can HTTP Request connect with Slack?

  • Can I use HTTP Request’s API with n8n?

  • Can I use Slack’s API with n8n?

  • Is n8n secure for integrating HTTP Request and Slack?

  • How to get started with HTTP Request and Slack integration in n8n.io?

Looking to integrate HTTP Request and Slack in your company?

Over 3000 companies switch to n8n every single week

Why use n8n to integrate HTTP Request with Slack

Build complex workflows, really fast
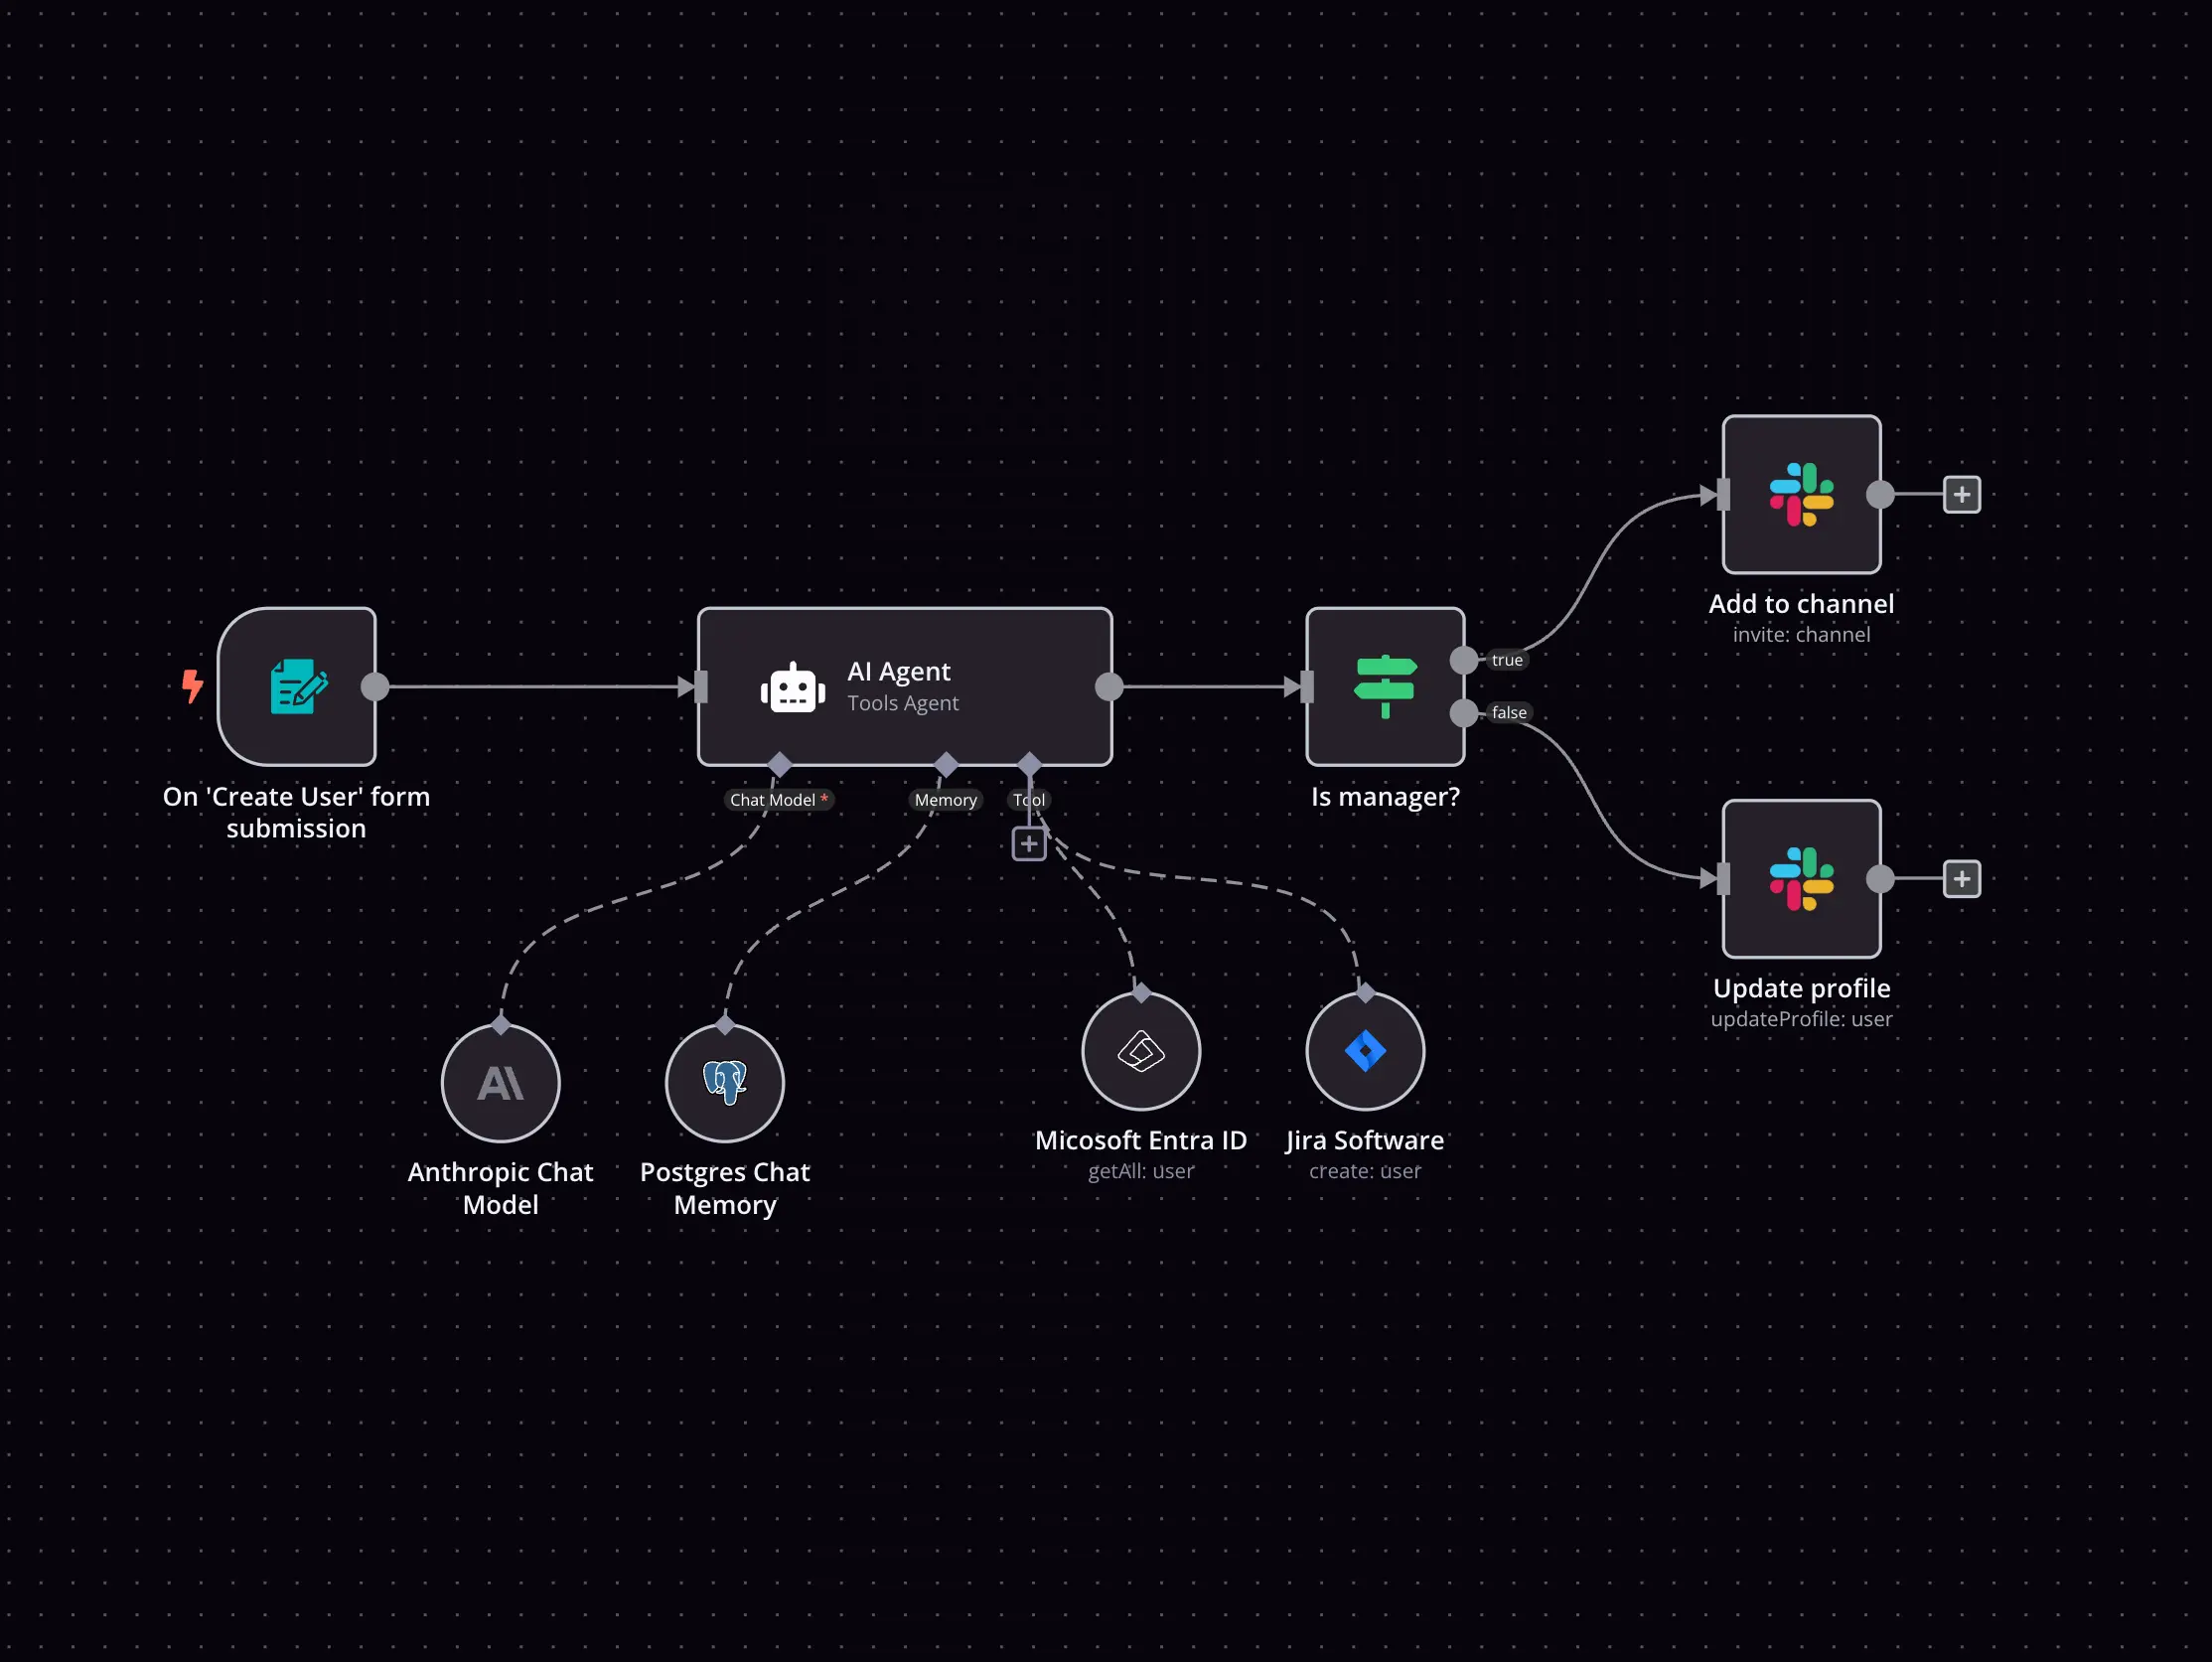
Build complex workflows, really fast

Handle branching, merging and iteration easily.
Pause your workflow to wait for external events.

Code when you need it, UI when you don't

Simple debugging

Your data is displayed alongside your settings, making edge cases easy to track down.

Use templates to get started fast

Use 1000+ workflow templates available from our core team and our community.

Reuse your work

Copy and paste, easily import and export workflows.

Implement complex processes faster with n8n

red iconyellow iconred iconyellow icon